Tuesday, October 4, 2022

Frog

knitted frog sitting against wall with arms out and legs crossed

I have finished knitting Frog!  I'm thrilled with how he turned out.  I learned a lot about shaping--although the shaping is accomplished pretty easily (increases, decreases, a few wrap-and-turn short rows), the way they are used to make him was really interesting.

I didn't cut/steek for the eyes--I just picked up stitches and then knit the eyelids.  I followed the directions for his left eye (stitching the eyelids together, then placing the eye inside & securing), but for the other eye (his right eye), I put the eye in and stitched the eyelids around it, and I like the way it came out better.

I'm really looking forward to knitting his clothes next!

Sunday, March 13, 2022

Frog and Toad, the kit arrives!

To celebrate my birthday this year, I ordered a present for myself--the Frog and Toad kit from Kelson Goods. I ordered it at the end of February, and it arrived!
An open paper envelope with skeins of yarn inside next to the book Frog and Toad Storybook Treasury standing upright with its spine facing the camera, both on top of a wooden desk
It's full of goodies--everything needed to make Frog and Toad with their little clothes!
Looking down on six skeins of yarn, embroidery thread wound around paper two stitch markers (on top of a small paper envelope), and a postcard from Kelson Goods showing knitted and crocheted Frog and Toad legs, on a wooden desk
The pattern by Kristina Ingrid McGowan is available in a knit and crochet version, and I'm planning on making the knitted version.

Tuesday, April 20, 2021

Risi-bisi (risi e bisi)


A steaming bowl of rice and peas in a dark broth with grated cheese on top
A steaming bowl of "risi-bisi"

I've always loved "risi-bisi," that is "risi e bisi," an Italian rice and peas dish, but found myself wanting a version made with whole-grain, brown rice.  The following is my version of the recipe using brown rice and anchovies, which is a little more like soup than the usual thicker risi e bisi, but you can make this recipe ahead of time and it will thicken.  For a vegan version, substitute mushrooms for the anchovies & stirred in cheese, and sprinkle toasted, chopped nuts on top instead of cheese.  If you don't have black garlic, just omit it.

Ingredients:

olive oil and/or butter
5-1/2 c. broth
1 onion, chopped
3 large anchovy filets (if using from a jar, packed in olive oil & salt, soak them in milk)
6 or more cloves of garlic, chopped
1 c. brown rice
2 c. (approximately) frozen peas, defrosted
1/2 c. (or more) grated parmesan, plus more for serving
juice of 1 large lemon
dash of honey, agave syrup, sugar, whatever
4 or more cloves of black garlic (optional)
salt and white pepper (or black pepper) to taste

Heat the broth to just below a simmer.

Mix the honey (or whatever sweetener) with the lemon juice; if you are including black garlic, mash it in with the honey-lemon mixture.

If you are using both butter and olive oil, heat your pot over medium heat, add your butter, then add your olive oil, and saute the onion.  When the onion is browned, remove the anchovies from the milk and add and mash in the anchovies to the onions; saute a few minutes.  Add the rice and stir in for a few minutes.

Add the broth and bring to a simmer, cook until your rice is done (typically for brown rice, simmer for 50 minutes, then take off the heat and steam for 10 minutes).

Remove from the heat, and stir in the lemon juice mixture, grated cheese, salt and pepper, put the peas in on top, cover, and let the peas steam for about 15 minutes.

Stir, and serve with more grated cheese on top.


Saturday, June 20, 2020

Date filled cinnamon rolls


A friend sent me Bon Appetit's recipe for Cinnamon Date Sticky Buns, and since we love dates, cinnamon, and home baking, I couldn't wait to try them, with some modifications--looking at the recipe, they seemed way too sweet for our taste, we prefer whole grains, unrefined nut oils, and there were a lot of steps to the recipe that I weren't sure would produce enough results for us that it was worth the effort.  The ingredients for the dough are non-negotiable, they say?  Not for me.  Our version of the recipe produces a incredibly fluffy roll where the dough has a lot of flavor from our freshly ground whole wheat flour and unfiltered, unrefined nut oils.

Dough ingredients:

1/2 oz. (14 g) fresh yeast or 1/4 oz. (7 g) dry yeast (or sourdough starter)
3/4 c. (180 ml) buttermilk (or milk)
6 tbsp. (106 ml) unrefined peanut oil, or nut oil of your choice
1 egg

1/4 c. (60 ml) honey, agave syrup, or sweetener of your choice
3/4 tsp. (4 g) salt
13 oz. (375 g) whole wheat flour
butter to grease pan

Filling ingredients (makes approximately 1/2 c. puree):

approximately 6.5 oz (180 g) whole medjool (or similar) dates
1-1/2 c. (360 ml) boiled water
2 tbsp. (30 ml) unrefined peanut oil, or nut oil of your choice
2 tsp. (5 g) ground cinnamon
1/4 tsp. (1.5 g) salt
1 tbsp. (15 ml) vanilla extract

Place yeast in bowl, add buttermilk, and let sit about 10-15 minutes so yeast dissolves.  Add rest of wet ingredients and salt, and mix thoroughly.  (I do all this in a KitchenAid mixer.)  Add flour, and mix until you have a sticky dough.  Cover bowl (I put a plate on top of the bowl) and refrigerate for 8 hours or more (overnight is fine) for a long, slow rise--it won't rise very much.

You can also make the filling the night before and refrigerate it also.  To make the filling, slice the dates in half and remove & discard the pits, and place them in a heat-proof bowl.  Pour the boiling water over them and let them soak for 10 minutes.  Drain the dates and put them into a food processor with the rest of the filling ingredients; process for 4 minutes, to produce a very smooth puree.

To fill and shape:  Butter about a 10 inch (about 25 cm) round cake pan or skillet.  Take the dough (and filling, if made ahead of time) out of the fridge--you can proceed immediately if you like, or let the dough warm up for up to an hour or so.  If the dough has risen, punch down and knead a bit, then roll out to about a 12 inch (30 cm) square; if it's difficult to roll, let it sit for 10-20 minutes under a cotton towel to relax, then try rolling again.  You will probably need to flour the counter a bit, as it can be a sticky dough.  Spread the filling over the whole square, leaving about 1/2 inch (about 1 cm) border around the edges, and then roll it into a log--feel free to dampen the long edge with a little water if it would help it seal.  If you want the rolls really pretty, feel free to trim the unfilled edges at the ends (I just smoosh them up a little bit).  Cut into 9 rolls, place them in the pan (or skillet) and cover (use the lid of a skillet or a cotton towel) to let rise for 60-90 minutes; at the end of the rising time, they may not entirely fill the pan and that's OK, because they will loft and fill out a bit in the oven.

To bake:  Preheat oven to 350F (180 C).  Cover with a skillet lid or parchment and aluminum foil, and bake covered for 20 minutes, then uncover them and bake for an addition 20-25 minutes, or until just golden brown.  Remove from pan and cool enough to enjoy!

If you like them frosted or glazed, follow the link to the Bon Appetit recipe for the glaze they use--we prefer them unglazed.

Sunday, November 10, 2019

Laugenbrötchen

Six round buns with coarse salt on top, on a cooling rack, on top of a speckled granite counter.
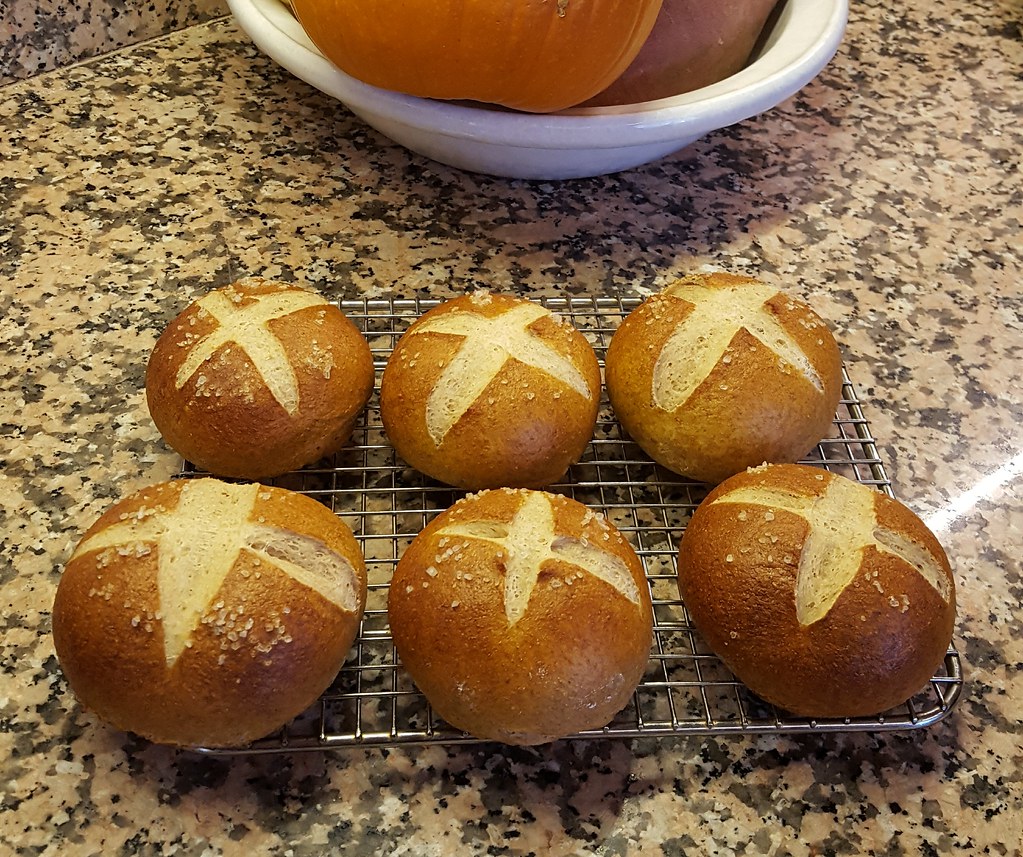
Homemade Laugenbrötchen

For years and years, I've been trying to bake Laugenbrötchen at home, or even find them in a bakery--every German bakery that we've visited hasn't heard of them.  When we visit our friends in Baden-Württemberg, we eat as many of them as we possibly can--we just love them.

On our last trip, we visited the wonderful Museum Brot und Kunst and found a fantastic cookbook, Laugengebackenes Brezeln, Brötchen, und mehr by Hanna Renz.  The recipe for Laugenbrötchen is fantastic--they taste just like the ones in Germany!  Preceding all the recipes are easy to follow, step by step instructions as well.

The book is entirely in German--here are the ingredients, as well as my adaptation into U.S. measurements and into my own preferred bread baking methods.  The first time I followed the recipe, I followed it exactly, then adapted it the second time for the same tasty results with my own preferred ingredients and amounts (e.g., a bit less salt in the dough).

680 g Weizenmahl (Type 550) / about 1-1/2 pounds of flour (I use from 50% to up to 100% freshly ground whole wheat)
3/4 W. fr. Hefe (30 g) / 2-1/2 tsp. dried yeast
400 ml handw. Wasser / 1-1/2 c. room temperature water
2 TL Salz / 1-1/2 tsp. salt
1/2 TL Zucker / 1-1/2 tsp. agave syrup
20 g Margarine / about 2-1/2 tbsp., or a little more than 1/4 stick, raw cultured butter
Etwas grobes, gekörntes Salz zum Bestreuen / Coarse salt for sprinkling on top
1 L water / a bit more than 1 quart water
3 EL Natron / 2 tbsp. + 1 tsp. baking soda

Method:
Put yeast in bowl, add the smaller amount of water, agave syrup, salt, and butter, then enough flour to knead into a rather stiff dough.

Note:  raw cultured butter is softer than regular butter, so it will mix in straight out of the fridge, and definitely mix in easily at room temperature, but if you're using regular butter, you may wish to soften it.

For 25%-100% whole wheat, I let the dough rest for 20 minutes, then knead it for 10 minutes, in my mixer with a dough hook.  This step isn't necessary for all white flour.

Let rest for 15 minutes, then shape into 12-14 balls on a floured counter and cover with a towel.  Let the balls rest for about 30 minutes.

Reshape the balls and put back onto the counter, under the towel, and let rest for about another 30 minutes.  In the meantime, put the larger amount of water into a 1 quart saucepan (a little deeper than wider is better) and let it heat up and preheat the oven to:
Elektro 210C / Electric or gas bake 375F
Umluft 190C / Convection 350F
Gas Stufe 3-4 / (I don't know the equivalent of this setting)
     [Update, Nov. 11: my friends in Europe says this is the equivalent of  about 180C/350F.]

Prepare a baking sheet with parchment paper or butter it, and have a sharp knife and a slotted spoon handy.

After the buns have finished this last resting, bring the water to a boil, turn down a bit, and very carefully add only up to 1 tbsp. of baking soda to the boiling water at a time--it will foam up a lot.  Add all the baking soda to the boiling water very carefully.  Bring the baking soda/water bath to a gentle simmer; you'll be adjusting the temperature as you bathe the buns to keep it at a low simmer.  One at a time, put a bun into the bath (I put it in upside down) and let it simmer for 10 seconds, then turn it over and let it simmer another 10 seconds for 20 seconds total; take it out of the bath and place it on the prepared sheet.  Cut a cross in the top with the sharp knife and sprinkle coarse salt onto it to taste.  Repeat with all the buns.

Bake the buns for about 17-20 minutes, until they're nicely brown on the bathed parts of the buns.

Saturday, November 2, 2019

Council of Indoor Gnomematters

The gnomes that live here were inspired to pose for a group photo--they are all proud members of their local chapter of the Council of Indoor Gnomematters:


A female knit gnome without a beard, a male knit gnome with a large beard, a manufactured toy gnome from the book Gnomes, a large plastic garden gnome with a sunflower, a small plastic gnome, three small ceramic gnomes with book (two from the book Gnomes), and two small knit gnomes, one of those with a knit pussy hat over his pointed cap.


Cedric and Timson are so happy to have the other gnomes join them!

Sunday, July 7, 2019

From a worn out undershirt

Inspired by the wonderful instructions and video at Upcycle Stitches, I made my first zokin (cleaning cloth) from scraps of tshirt fabric:

Square of grey fabric with hand sewn running stitches around the border, vertically, and diagonally, next to a ruler showing it measures about 20 cm


It's so handy and a pleasure to use, so I wanted to make some more.  I also had a worn out undershirt in the mending box, so decided to make a produce bag from some of the tshirt, and zokin from other parts of the shirt.  So first I cut off the fabric for the produce bag:

Worn out, white v-neck tshirt, cut horizontally just below the sleeves


Then I folded the bottom piece along the long edge, and pinned two sides to sew together, to make a double-sided bag; since the fabric is a stretchy, cotton knit, I wanted two layers of fabric for the bag sides so it wouldn't stretch out too much (and possibly tear) when filled with produce.  The bottom of the tshirt became the top of the bag--the finished edges were easy to fold down and secure with a buttonhole stitch to make a channel for a drawstring (a piece of leftover ribbon).  I then weighed the bag, and used a laundry marker to write the bag's tare weight on it:

Produce bag with "2 oz." written on it.

Then I cut off the sleeves, and put those in my "stuffing bag"--a bag of small fabric and yarn scraps that can be used for stuffing for stuffed animals, toys, etc.  I then cut the remaining top of the tshirt in half vertically:

Remaining top of the shirt with sleeves cut off, and cut vertically down the center of the top, with scissors next to it

I pinned the two remaining pieces of the top together (wrong sides facing), on three sides, to close up and sew up the seams, before turning it right side out and sewing with running stitches to make into a zokin:

Irregularly shaped tshirt scraps, from top of one side of tshirt, pinned on three sides

They are irregularly shaped, but they work great!

Two zokin (cleaning cloths) that look once again like two sides of the very top of a vneck tshirt, with running stitches around the edges and vertically.