Sunday, November 10, 2019

Laugenbrötchen

Six round buns with coarse salt on top, on a cooling rack, on top of a speckled granite counter.
Homemade Laugenbrötchen

For years and years, I've been trying to bake Laugenbrötchen at home, or even find them in a bakery--every German bakery that we've visited hasn't heard of them.  When we visit our friends in Baden-Württemberg, we eat as many of them as we possibly can--we just love them.

On our last trip, we visited the wonderful Museum Brot und Kunst and found a fantastic cookbook, Laugengebackenes Brezeln, Brötchen, und mehr by Hanna Renz.  The recipe for Laugenbrötchen is fantastic--they taste just like the ones in Germany!  Preceding all the recipes are easy to follow, step by step instructions as well.

The book is entirely in German--here are the ingredients, as well as my adaptation into U.S. measurements and into my own preferred bread baking methods.  The first time I followed the recipe, I followed it exactly, then adapted it the second time for the same tasty results with my own preferred ingredients and amounts (e.g., a bit less salt in the dough).

680 g Weizenmahl (Type 550) / about 1-1/2 pounds of flour (I use from 50% to up to 100% freshly ground whole wheat)
3/4 W. fr. Hefe (30 g) / 2-1/2 tsp. dried yeast
400 ml handw. Wasser / 1-1/2 c. room temperature water
2 TL Salz / 1-1/2 tsp. salt
1/2 TL Zucker / 1-1/2 tsp. agave syrup
20 g Margarine / about 2-1/2 tbsp., or a little more than 1/4 stick, raw cultured butter
Etwas grobes, gekörntes Salz zum Bestreuen / Coarse salt for sprinkling on top
1 L water / a bit more than 1 quart water
3 EL Natron / 2 tbsp. + 1 tsp. baking soda

Method:
Put yeast in bowl, add the smaller amount of water, agave syrup, salt, and butter, then enough flour to knead into a rather stiff dough.

Note:  raw cultured butter is softer than regular butter, so it will mix in straight out of the fridge, and definitely mix in easily at room temperature, but if you're using regular butter, you may wish to soften it.

For 25%-100% whole wheat, I let the dough rest for 20 minutes, then knead it for 10 minutes, in my mixer with a dough hook.  This step isn't necessary for all white flour.

Let rest for 15 minutes, then shape into 12-14 balls on a floured counter and cover with a towel.  Let the balls rest for about 30 minutes.

Reshape the balls and put back onto the counter, under the towel, and let rest for about another 30 minutes.  In the meantime, put the larger amount of water into a 1 quart saucepan (a little deeper than wider is better) and let it heat up and preheat the oven to:
Elektro 210C / Electric or gas bake 375F
Umluft 190C / Convection 350F
Gas Stufe 3-4 / (I don't know the equivalent of this setting)
     [Update, Nov. 11: my friends in Europe says this is the equivalent of  about 180C/350F.]

Prepare a baking sheet with parchment paper or butter it, and have a sharp knife and a slotted spoon handy.

After the buns have finished this last resting, bring the water to a boil, turn down a bit, and very carefully add only up to 1 tbsp. of baking soda to the boiling water at a time--it will foam up a lot.  Add all the baking soda to the boiling water very carefully.  Bring the baking soda/water bath to a gentle simmer; you'll be adjusting the temperature as you bathe the buns to keep it at a low simmer.  One at a time, put a bun into the bath (I put it in upside down) and let it simmer for 10 seconds, then turn it over and let it simmer another 10 seconds for 20 seconds total; take it out of the bath and place it on the prepared sheet.  Cut a cross in the top with the sharp knife and sprinkle coarse salt onto it to taste.  Repeat with all the buns.

Bake the buns for about 17-20 minutes, until they're nicely brown on the bathed parts of the buns.

Saturday, November 2, 2019

Council of Indoor Gnomematters

The gnomes that live here were inspired to pose for a group photo--they are all proud members of their local chapter of the Council of Indoor Gnomematters:


A female knit gnome without a beard, a male knit gnome with a large beard, a manufactured toy gnome from the book Gnomes, a large plastic garden gnome with a sunflower, a small plastic gnome, three small ceramic gnomes with book (two from the book Gnomes), and two small knit gnomes, one of those with a knit pussy hat over his pointed cap.


Cedric and Timson are so happy to have the other gnomes join them!

Sunday, July 7, 2019

From a worn out undershirt

Inspired by the wonderful instructions and video at Upcycle Stitches, I made my first zokin (cleaning cloth) from scraps of tshirt fabric:

Square of grey fabric with hand sewn running stitches around the border, vertically, and diagonally, next to a ruler showing it measures about 20 cm


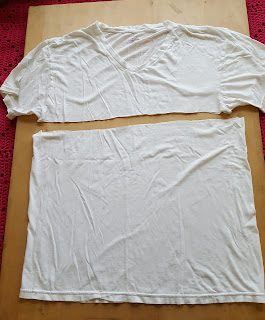
It's so handy and a pleasure to use, so I wanted to make some more.  I also had a worn out undershirt in the mending box, so decided to make a produce bag from some of the tshirt, and zokin from other parts of the shirt.  So first I cut off the fabric for the produce bag:

Worn out, white v-neck tshirt, cut horizontally just below the sleeves


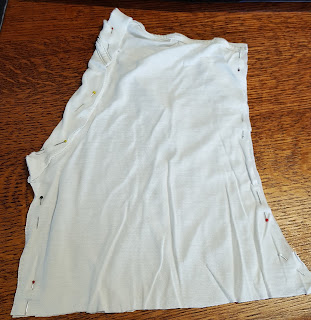
Then I folded the bottom piece along the long edge, and pinned two sides to sew together, to make a double-sided bag; since the fabric is a stretchy, cotton knit, I wanted two layers of fabric for the bag sides so it wouldn't stretch out too much (and possibly tear) when filled with produce.  The bottom of the tshirt became the top of the bag--the finished edges were easy to fold down and secure with a buttonhole stitch to make a channel for a drawstring (a piece of leftover ribbon).  I then weighed the bag, and used a laundry marker to write the bag's tare weight on it:

Produce bag with "2 oz." written on it.

Then I cut off the sleeves, and put those in my "stuffing bag"--a bag of small fabric and yarn scraps that can be used for stuffing for stuffed animals, toys, etc.  I then cut the remaining top of the tshirt in half vertically:

Remaining top of the shirt with sleeves cut off, and cut vertically down the center of the top, with scissors next to it

I pinned the two remaining pieces of the top together (wrong sides facing), on three sides, to close up and sew up the seams, before turning it right side out and sewing with running stitches to make into a zokin:

Irregularly shaped tshirt scraps, from top of one side of tshirt, pinned on three sides

They are irregularly shaped, but they work great!

Two zokin (cleaning cloths) that look once again like two sides of the very top of a vneck tshirt, with running stitches around the edges and vertically.


Saturday, April 27, 2019

Sugo

I want to start getting my family's recipes out into the world--why not start with one of the first ones that I ever learned, our recipe for sugo, otherwise known as red sauce, spaghetti sauce, or just sauce.  No one in my family, that I know of, ever wrote it down, and we learned it by being shown the amounts of the ingredients as we made it--spices in the palm of a hand, numbers of tomatoes on the counter, etc.

I learned this from my mother, her sister (my aunt), and their mother (my grandmother) who was born in San Francisco in 1906, and who learned it from her mother, from Ferbicaro, Calabria, Italy, the Papa/Ludovici family.

My initial notes:


You can make this with or without meat, and with or without many of the ingredients, and all amounts are approximate--use what you have, use up what you need to, and make it to taste.  No ingredient is totally essential, although without any tomatoes or tomato product, it's a different sauce, but if you are out of onions, or garlic, or particular herbs or spices, don't worry about it--just leave those out.  Need to use up a head of garlic that's sprouting?  Use it up--put the whole thing in.  Experiment!

Apologies for the US-centric measurements, since it took a lot of work to get this far--if anyone converts to metric, please let me know so I can post a link!

The recipe:

Read the recipe through first--trust me.  You can make this in the morning and have it ready in the evening, or make it days ahead--it keeps in the fridge for at least a week, and freezes beautifully.

Meat (optional):
  • About 1 lb. lean hamburger, or Italian sausage (or just about any sausage), or lamb, or veal, or chicken, or a mixture of any of those.  You can also use leftover meats.

Mushrooms (optional):
  • Dried:  If you're using dried mushrooms, reconstitute them in water that has just boiled:  add the water, cover, and let sit.  (Boiling water makes some, like porcini, bitter.)  Slice or chop if desired.  If using porcini, reserve about 1 c. of the "broth" from the top, not the sandy bit at the bottom.
  • Fresh:  1-2 lbs. of fresh mushrooms, chopped if desired (e.g., crimini, portabello, oyster, lobster, chanterelles, etc.)
Other ingredients:
  • 3 tbsps. or more very good extra virgin olive oil (I like an unfiltered, cold pressed) or oil that you like, or butter, or a combination of butter and olive oil
  • 1-2 medium yellow onions or 1 large onion, or a mixture of onion and shallot, chopped finely.  Look for a rather flat onion, since they can be sweeter.
  • 3-6 or more big cloves of garlic, peeled and sliced, chopped or crushed/pressed, depending on your taste.
  • 10 or so roma tomatoes or equivalent amount of whatever tomatoes you have on hand--really--you can even use cherry tomatoes, seeded and roughly chopped.  (I usually get "heirloom" tomatoes at the farmers' market.)  You can use way more tomatoes if you don't have any prepared tomato sauce, strained or pureed tomatoes.
  • Carrot: have one handy, because if your sauce is too acidic after simmering for a few hours, toss in the carrot and simmer for another couple of hours to cut the acidity

Liquids:  Use one of these choices:
  • 1-2 cups or more good, dry, full-bodied red wine (e.g., cabernet)--it doesn't haven't to be expensive, just drinkable.
  • 1-2 cups of stock (meat or vegetable--your choice)
  • Or a mixture of wine and stock--if you only have white wine on hand, then do use some stock with it.
  • If using canned tomato sauce, about 60 oz. cans of good quality organic tomato sauce, or pureed or strained tomatoes
 Herbs and/or spices:
  • 3-6 fresh sprigs of marjoram (or more to taste) or about 1 tbsp. dried, crushed
  • 1-2 sprigs of fresh rosemary (or more to taste) or about 1 tbsp. dried, crushed
  • 3-4 sprigs of fresh oregano (or more to taste) or about 1 tbsp. dried, crushed
  • 3-4 bushy stems of fresh basil or up to one bunch (to taste) with the leaves removed, and the larger ones sliced roughly, or about 1 tbsp. dried, crushed
  • dash of white pepper (or black if you prefer)
  • dash of salt or dash of honey (or agave syrup) if you avoid salt
Directions:

Use your heaviest bottomed pot, 4 quarts or larger.

Open cans, get out the wine, have the liquids ready to go.

If you're using raw meat, brown the meat, then turn off the heat and drain the fat--all the fat.  Really.  Trust me.  If using fatty sausage, take the meat all the way out, and wipe out the pot a bit with a rag or paper towel.  Put the meat back in the pot.

Chop your onions.

If you're not using meat, then heat up the pot (a bit above medium heat) and add your olive oil or butter.  If you're using butter, add the butter first then the olive oil.  If you are using meat, still add your olive oil and/or butter, but you may want a little less.

Add onions to the pot and sautee on high enough heat to brown them well without burning.  Meanwhile, slice and/or chop your mushrooms.  If you're onion is burning too quickly, just turn the heat down or turn the heat off until your mushrooms are ready.

If you're using dried spices, turn the heat down on the pot and add them to the pot right before adding the mushrooms--put them into the palm of your hand, and rub your hands together to crush them into the pot.  Stir them in so they don't burn.  

Add the mushrooms to the pot on high enough heat and sautee.  While they're sauteing, prepare your garlic.  You want to sautee fresh mushrooms until they release their liquid--if they do this and you're still preparing your garlic, just turn the heat off under the pot.  Dried and reconstituted mushrooms don't need very long, or can sautee for a while.  You don't want to prepare your garlic ahead of time--it will lose and turn flavor.  The longer you cook your garlic, the milder it will be, so cook it to taste.

If using fresh tomatoes, add them now and saute until they're all squishy and saucy.

Add your liquids.  If using mushroom "broth" from dried mushrooms, add that now, too.

If using fresh herbs, tie them all except the basil together in a bundle with 100% cotton string and drop them into the pot and stir them in.  (If I have a lot of time, or it's a special occasion, I'll remove the leaves from the thyme and marjoram and put those into the pot, and remove the leaves from the rosemary and chop them finely, and then just leave the oregano in as sprigs to be removed later--the oregano in my garden can be a bit bitter to eat.)  Prepare basil leaves, and add to the pot.

If you're using cooked meats, add them to the pot now.

Bring back up to a simmer and simmer covered for as long as 8 hours, stirring every 30 minutes or so to prevent sticking.